We recently updated (technically “re-keyed”) some of our clients’ SSL certificates in response to the Heartbleed Bug announced last week. The process isn’t all that complicated, but it demands referring to the docs of the web host and the certificate provider in order to get all of the steps right. Getting this process wrong can result in an ugly untrusted certificate message on the site.
Oftentimes we work with a client who has already established an account for DNS, and it’s simpler for the client to stick with that provider when purchasing an SSL certificate. Oftentimes this provider is GoDaddy. Say what you will about GoDaddy, they are a very relevant player in this space and it’s important to know how to work within their system, even as we may steer clients to preferred providers such as DNSimple or NameCheap.
And as is common with our Rails apps, we’re hosting on Heroku.
We found ourselves jumping back and forth between Heroku’s SSL endpoint docs and GoDaddy’s SSL certificate docs. The following is a roadmap between the two sets of docs, with some extra screenshots and clarification on a step that isn’t explicitly covered in either.
Step 1: Generate a new private key using openssl
Step 2: Use the private key to create a certificate signing request (CSR)
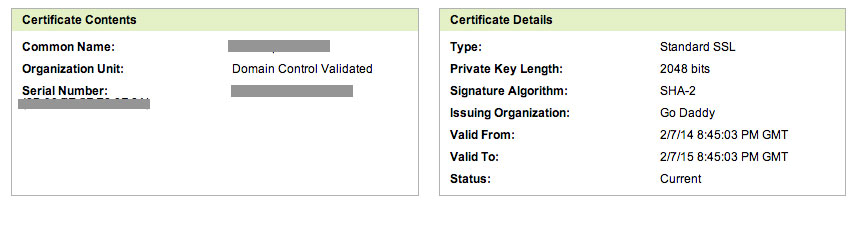
The common name must match the common name used with the current certificate, and the presence or lack of “www” matters. Refer to your current certificate on GoDaddy.
Step 3: Submit the certificate signing request to GoDaddy
The steps are listed under ”To Re-Key an SSL Certificate.” Unless you know of any reason to change the signature algorithm or certificate issuing organization, make sure they match the current setup.
Step 4: Download the new certificate
Heroku instructs to select Nginx as the server, Apache 2.x if Nginx is not an available option. (Note: we encountered this option later, during the certificate download step rather than the certificate request submission step.)
In our case, the new certificate was immediately available in our GoDaddy certificates dashboard, right below the current certificate. The old and new certificates look identical from the dashboard.

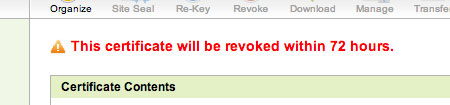
In order to distinguish which certificate is the old and which is the new, click into each certificate. The old certificate will have a warning message at the top of the page announcing that the certificate will soon be expired. Download the other certificate.
Step 5. Combine the certificate file and the intermediate certificate bundle into one new .crt file
This step is not clearly outlined in either sets of documentation, but it is a necessary step. When you download the certificate, you will receive two files: the certificate file specific to your account and an intermediate certificate bundle.

The intermediate certificate bundle is a combination of public certificates explaining to GoDaddy how to use the private certificate file. The intermediate bundles can also be found here. GoDaddy provides some more info on intermediate certificates.
Concat the certificate file and the bundle file (both will likely have the .crt extension). We named the new file using the certificate file name plus “_bundle” to keep things straight. We also updated the permissions on the new file to match that of the other .crt files.


(The “@” symbol listed at the end of the .crt files’ permissions info indicates that there are “extended attributes” (metadata) associated with the file. More on extended attributes.)
Step 6. Update the certificate on Heroku
Replace “server.crt” in Heroku’s example with your newly-created .crt file name.
That should do it.
(What’s a .pem file? With Heroku you update the .crt file and the .key file using the certs:update command. The other option in some scenarios is to combine the .crt and .key into one file. That file is typically given a .pem extension.)